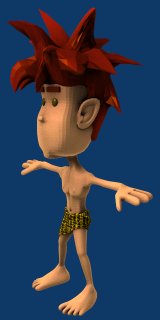
 The materials and shader settings are now done, barring any unforseen tweaks and adjustments required as this project progresses. The hair has been made a little translucent, and specularity and translucency are set to vary between the fringes of the object and it’s central surfaces, using a gradient/blend texture to provide the template for the gradual transition.
The texture for the loin cloth was one of my main completion goals for the day and I am glad it is done and has turned out well. For this texture I decided to use UV mapping because that is the most reliable way to ensure appropriate texture movement when the object deforms in various poses and animation. Other than the faces that make up the knot at the waist, the entire object was un-wrapped using simple cylindrical projection. The knot was captured with a flat projection from the window. The 1’s and 0’s animal print was created in Inkscape and imported into Blender as a PNG.
Last but not least, it was essential to have a reasonably believable skin-like shading for the body and head, to further emphasise the pixelly un-reality of the character. Using a few built-in procedural textures and some toon shading tricks, the end result is quite convincing. As of now, this character looks much better than I had hoped.
Samir
Liked this article? Please share it: ![]()
![]()
![]()
![]()
![]()
![]()

we should see if CafePress makes designer loincloths… that would be some sweet merchandise 😛