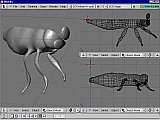
 While I was experimenting with the Fiber script, I came across the latest Weekend Challenge (#77) over at Elysiun. I am definitely not quick enough with Blender to try my hand at one of those yet, but #77 had an insect theme to it, and that lead me to think of modelling and insect to go with my newly found grass skills. A few Google Image Searches later, I decided to model some sort of moth.
… easier said than done. While I now knew perfectly well that I could model the wings as extruded bezier curves like I did during one of the tutorials in the manual (twisted metal, 2 posts ago), I wasn’t very clear on how to do the body and limbs. First I tried what I thought would be the easy way. I started with a UVSphere and tried to stretch and flatten it into the approximate shape of an insect torso. A little selective vertice editing in proportional mode, and I had a knob at one end that was supposed to be the head. To see how I was doing, I switched on Sub-Division to add detail, and the whole thing looked like a mess – a blob of clay with stretch marks all over the place. I gave up on that and decided to try again.
I had to try a more controlled approach, with fewer vertices to begin with, so that sub-division could add in the necessary detail. This time I started with mesh circle of 12 vertices and started extruding and sizing to create the basic shape, similar to the sword I modelled many posts ago. At the end I had a very bumpy spindle shaped object with a spherical knob on top. It looked nothing like an insect but it was a start. Now it was a matter of adjusting individual vertices to get rid of all regular geometric arrangements and make it into an organic shape. Many proportional edits later I was satisfied with my bumpy insect torso.
Now came the compound eyes and the limbs. The compound eyes I added in as a UVSphere scaled and rotated into the proper position, and then mirrored into a matching pair. The least complicated way to handle the limbs would have been to make them separate objects, but I decided to make them part of the same mesh to future proof this model for animation, with an armature setup. This meant that I had to extrude faces off the side of the body and model the various segments of the limbs from there. I switched off subdivision to work with the actual faces, and I realized that my model was too efficient. There were a few large faces, and I needed to create smaller ones to extrude from, without rearranging anything. What better excuse to try out Blenders new Knife and Face-loop cut tools? Since I had no idea what these two actually mean I just tried them out one at a time. I selected a quad face in the side view and tried out the knife tool first. This was very easy to understand once I tried it, but it resulted in some new triangular faces. From what I have read these are not supposed to be good when animating an object, so undo, and I tried the face loop cut tool.
Until I tried this out I was ignorant about what a ‘face loop’ was, but the excellent interface of this tool explains it well. Select this tool and move your cursor over the object and yellow lines blink on to show you where a cut can be made on the various face loops (basically a loop of adjacent faces that form a flat strip along the surface of a 3D object). With this is was easy to add detail to the areas I needed to extrude the limbs from. At this point I deleted one side of the model, so that I could mirror it after I had created the limbs for one side. The limbs were simply a lot of hard work with extrusion, scaling, and rotating, both in and out of proportional editing mode. Once the basic modelling was done I sculpted the legs into their natural position, and that’s what I have completed so far, as you can see in the image.
A lot remains to be done, including some antennae and the wings. Most importantly, once the modelling is done I am going to have to tackle UV textures to get the effect I want. From what I have read on the subject, I might find it easier to use an external UV unwrapper than starting with Blender’s built-in system.
Watch this space for updates.
Liked this article? Please share it: ![]()
![]()
![]()
![]()
![]()
![]()
